How to, Indian food, Pure Punjabi
A step-by-step guide: How to make roti (chapattis) from scratch
Apr
Punjab is known as ‘The bread basket of India’ due to the vast amount of crops grown in this rural area, which provides 80% of India’s produce.
As the master region of breads, Roti (also known as chapatti) is the daily bread that accompanies each meal.
Roti is an unleavened flatbread from Punjab India, and is also a staple food across South and South East Asia, the Caribbean, and parts of southeast and east Africa.
It is a simple daily bread made only with wholewheat flour and water. Despite the simplicity of this flatbread, it is actually quite difficult to make it properly, by which we mean perfectly round, thin, with brown spots on one side, and cooked so that the circle of dough fully inflates and puffs when being cooked, yet remains soft and pliable, not cracked, hard or charred.
It is so essential to our traditional diet that the word ‘Roti’ is also the word generally used to say ‘food’ in Punjabi! You will often hear people say “would you like Roti?” meaning “would you like dinner”.
Making Roti…a skill that is an art and a science
Making Roti is an art, (but there is a science to it as well), and one that is perfected over time. Our step-by step guide on how to make Roti from scratch helps you to follow the correct order and original old-school methods as taught to us by our mothers and grandmothers.
The saying ‘practice makes perfect’ was invented for learning how to make Roti. There’s no need to feel intimidated by this, it just requires a little commitment and regular and frequent practice, but it is impressive when you can make them perfectly!
To help you along the way, we’ve put together this step-by-step picture guide for you to look at when making Roti. This breaks it down into a step-by-step process to be able to make soft, round and evenly-sized Rotis!
A step-by-step guide: How to make Roti (chapattis) from scratch
Ingredients
- Atta – A tea-mug of Chapatti flour – approximately 250g to make 5 Rotis, (but we never weigh or measure).
- Water – room temperature.
- Nothing else…except a small amount of butter for butttering the cooked Rotis.
NOTE: This is like a French baguette – meaning that there is no preservative in the dough and it goes hard the next day. The dough is always made fresh each day and Rotis are served fresh for each meal.
Making & kneading the dough.
- Make the atta (dough) by mixing flour (this is often labelled as ‘atta’ or chapatti flour) and water till you have a soft dough. Slowly add water while mixing with your fingers in a continuous clockwise motion incorporating all of the dough as you mix. After the addition of a little water the dough will start to take on a crumble like texture. When your fingers start to feel wet, start rubbing the sides of the bowl. This will allow the dough to pick up any dry flour and so build a bigger dough ball. Keep doing this process until you have one large dough ball, and a clean mixing bowl. Knead once for a few minutes until well mixed, (it will be quite sticky). It does not need continuous ‘working’ and should not get warm, or hot, due to excessive handling. After 5-10 minutes knead for a second time, (it will feel smoother). This is always taught and learned by ‘feel’, and so it may take some practice, but the finished dough will be firm but ‘give’ when pressed with a thumb.

Forming the dough ball, Pera – (Peh-rah)
2. After the second kneading, take a piece of dough that is approximately the size of a satsuma. And start rolling it into smooth circle.

3. You want to create a small dimple on one side. This round of dough is called a ‘pera’ (pronounced peh-rah)

Flouring the Pera
Roll the pera (dough ball) in some of the atta (flour)

4. Flatten the pera (dough ball) on each side

Forming the dough by hand.
5. Take the flattened pera (dough ball) and further flatten it by pressing it, and rotating it anti-clockwise, between the palm of your right hand and the fingers of your left hand. This will also make the pera bigger in preparation for being rolled out.

Rolling out the Roti
6. Roll out the flattened pera to roughly the size of a side plate, ensuring that you turn the flattened disc often and apply even pressure when rolling to give a round shape! As you roll out, if the roti is sticking, dip both sides in the flour, but you must shake off the excess flour. You need just enough flour to prevent sticking but never too much as you will have a hard, dry roti when you cook it.

Removing excess flour from the Roti.
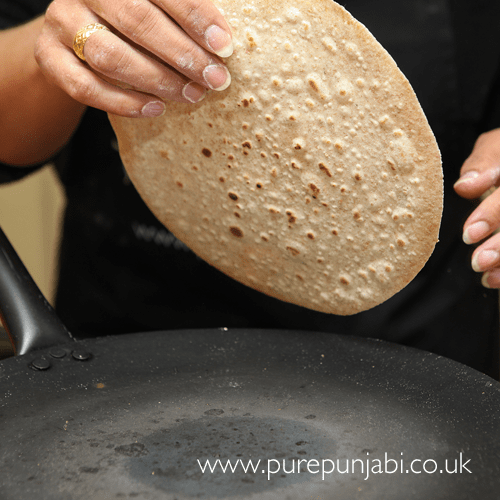
7. Take the rolled out disc and firmly pass the disc from one hand to another. This helps to shake off any excess flour and make the disc a fraction bigger. Pass it back and forth roughly 10 times. This move is NOT a throw of the roti from hand to hand. The hands stay very close and it is almost a slapping/clapping movement.

Cooking the Roti
8. Pre-heat a Tava (flat plate) to a medium to high heat. If you don’t have a Tava, then any flat smooth pan will do. Take the roti and, in one firm motion, put one side down onto a Tava (flat plate). Do not throw it. Place it (slap it) firmly onto the tava.

9. The moment you can see the dough cooking, (some colour change), turn the roti over. It’s important NOT to over-cook the first side, so this will be around 5-7 seconds – fairly quick! Look for the colour change…rather than count seconds (a guideline). As you can see from the picture below, the first side does not have any brown spots on it

10.The second side stays on the heat until you have a number of brown spots.

11. Once the second side is cooked (like you see in the picture below) remove it from the heat. You will now finish cooking the first side.

Puffing the Roti
12. To finish cooking the first side, you apply fierce heat to it. If you do not have gas, but have an electric hob/cooker, put the first side of the roti (spotty side faces down), under the electric grill (it needs to be on the highest temperature) and again, it will puff like a balloon…
If you have a gas hob/cooker, this is done by placing the first (non spotty), side of the roti directly over a lower flame, (spotty side faces up). The roti will then puff like a balloon! (SEE BELOW for images of roti puffing over gas flame on our Indian Experience Cookery workshops). As soon as it is puffed, remove it from the grill or flame. Do NOT let the underside brown or burn.


Buttering the Roti
13. Lightly butter the side with the brown spots and stack the cooked rotis in pairs – spotty sides facing each other (the two buttered sides facing each other). Wrap the stacked rotis in a clean teatowel to keep warm and soft.

Keep practicing and do share any pictures or videos of rotis that you’ve made, using the hashtag #PPCookerySchool
Good luck and enjoy making them!
Roti is traditionally served with dhal (lentils/pulses/beans), or any type of Sabjhi, (vegetable curry)


We also have a very traditional and rarely-seen corn chapatti -Makki di Roti, which is always served with Saag. We have this in a dinner kit – Makki di roti & Saag.


Roti puffed over a flame at our ‘Indian Experience’ cookery workshop and our corporate team-bonding workshops, where we teach in the way that we learned from our mothers.


If you’d like to learn how to make traditional Punjabi food in the way that the mother teaches the daughter, then take a look at our Indian Experience full day cookery workshop, held on the South Somerset/West Dorst border, right of the A303. Click HERE for details.
To learn about the other types of Punjabi bread, take a look at our Bread-making & Tasting Experience workshop, which teaches Paratha, Puri and Naan bread. Click HERE for details.
To try making paratha yourself, take a look at our step-by-step post